Choosing insulation for the interior service wall was challenging. I originally thought that I would do the work myself. My plan was to fill the 2x4 space with batt insulation. Intimidation set in once I realized how many wires, plumbing pipes, receptacles, and mechanical elements are integrated into the walls. Reading this article at Energy Vanguard (https://www.energyvanguard.com/blog/54275/How-to-Grade-the-Installation-Quality-of-Insulation) made me wonder; Is it possible to get a Class I installation in walls with so many "complications"?....cutting and splitting batts, handling them and pushing them around to fill the cavity uniformly...seemed like an impossibility.
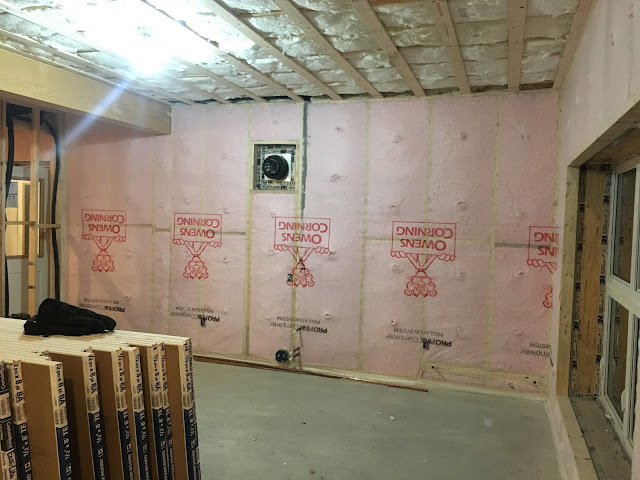
Luckily, Bill Gifford (Home Shield Insulation), the insulator for my attic spaces, also knows a thing or two...or three, about dense packing fibreglass. He uses the Owens Corning ProPink wall insulation system (http://insulation.owenscorning.ca/builders/products/propink.aspx) which is really a type of BIBS (Blown In Blanket System). The system involves stapling a breathable semi-stretchy fabric to the service walls. The fabric is cut to allow for wall penetrations like electrical boxes, pipes, etc. A pointy ended pipe attached to a flexible hose is pushed through the blanket in several places and the insulation fills the cavity....It is not quite as simple as that so I'll elaborate! Blowing the insulation into the walls is very methodical and appears to be an art of sorts. He typically starts in the bottom corner (Photo 1-1 to 1-4) of a stud cavity and angles the pipe towards the corner, as the corner fills, the sound of the air coming out of the pipe changes, and flow rate of the insulation delivery basically stops once the dense packing is complete for the settings on his machine. As soon as the pipe is moved, the insulation starts flowing again . A cavity can be filled pretty quickly. I suspect that Bill's technique has been developed after years of doing this type of insulation system. He interacts fluidly with the delivery hose. Once dense packing is complete in one area of the cavity, he moves the delivery pipe to another, stabs a hole and starts filling again. He was able to complete the insulation upstairs in one day.
It took about 2 days to staple the fabric and 2 days to complete the insulation installation. After installation is completed he carried out some quality assurance on the blown in system. An Inspect-R gauge is used with air under pressure to determine R-value (photo 3-1 through 3-5). Values acquired for the gauge were higher than 0.65 so we have at least R15 in the interior service wall! Besides the fact that the R-value is higher than typical batts for a 2x4 cavity, the filling is much better. The insulation fills everything: it works around electrical boxes, between wires, etc. No cutting, splitting and pulling batts into place. This is a great wall system. I am much happier now looking at pink walls! I have been staring at studs for much too long.....The structure is now starting to look like a house.
Things are warming up! Before christmas, the building was cold and I found it unbearable while working. The electrical inspection passed and the service was hooked up to the pole on December 22nd. Since then the heat has been on. Heating up a cold structure is not small feat. The amount of thermal mass in the concrete slab alone is huge i.e. about 25 cu meters. I estimated that it would take almost 300 kWh to bring it up to temperature! Thick walls and lots of material make for a slow heating process. With temporary construction heaters running the house has chewed through almost 1500 kWh just bringing the house up to temperature. The heating load has decreased considerably since the temperature inside has levelled. The load does appear to be related to the number of people working in the house and whether or not its a sunny day. I have nothing quantitative at this point but it looks like the house is behaving as it should!

Photo 1-1. blowing insulation into the corner of a stud cavity

Photo 1-2. Blowing and dense packing.

Photo 1-3. Dense packing the upper parter of the cavity

Photo 1-4. Finishing the cavity.

Photo 2-1. Living Area

Photo 2-2. Around one of the entry doors

Photo 2-1. Dining area

Photo 2-1. Kitchen

Photo 3-1. Inspect-R Density Gauge. This is part of the quality assurance system for the blown in system.
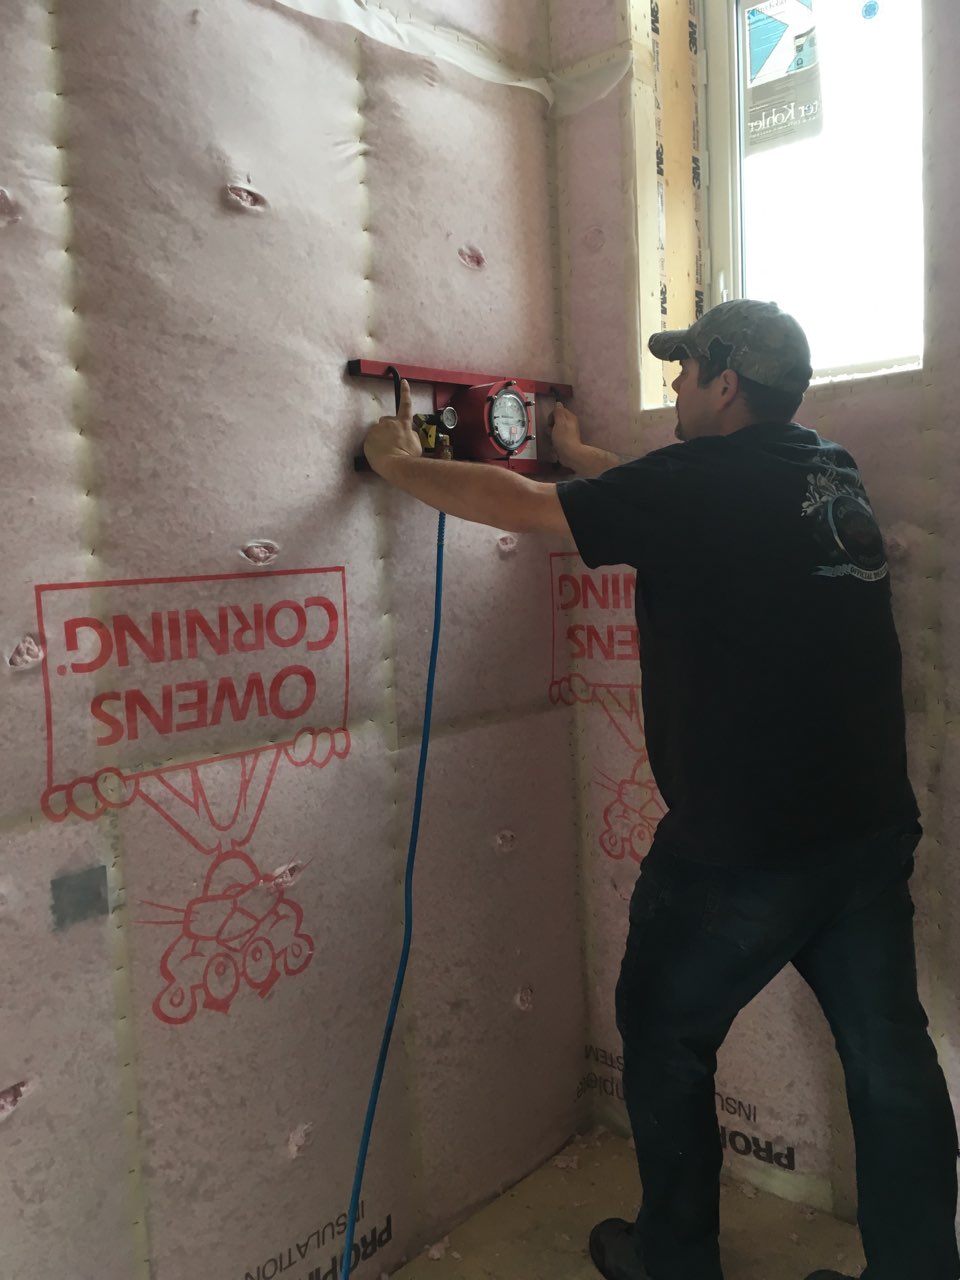
Photo 3-2. Applying the Inspect-R gauge against the stud cavity.

Photo 3-3. A reading of 0.8 on the magnehelic gauge.

Photo 3-4. A reading of 1.2 on the magnehelic gauge.

Photo 3-5. According to the gauge, all places measured in the wall are higher than 0.65 so the installed R-value is higher than 15.
Hello David,
ReplyDeleteGreat to see a Passive house being build here in NL. Your home looks great with the Cottles Clapboard on it as well.
You've obviously done your homework on building science for the construction of your home. I had a quick question for you just to make sure my thinking is correct. Do you have any worries about moisture condensing on the inside of your OSB and being absorbed by the fiberglass. Would I be correct in saying that there enough R-value on the exterior side that the risk of this is negligible?
Thanks
Dan
Hi Dan, thanks for your comment. Ive done quite a bit of homework! In preparation for building this house I completed the PHIUS builders course and wrote the PHIUS certification examination! It was money well spent!
DeleteThe only time that this might be an issue is during heating season if the interior humidity is high. The likelihood of this is fairly small. Cold fresh air being brought inside through an HRV has a low RH. Once that air is heated, the RH decreases further. Besides that, as you mentioned, there is enough "exterior" R value that the OSB is on the "warm" side of the wall. Additionally, continuous drywall with latex paint also creates a good vapour retarder that will help prevent interstitial condensation.
Recently, I had to open up a section of wall in order to inspect the fresh air intake for the ERV, the weather was cold, the interior humidity was about 56% and there was no visible condensation. OSB will help buffer some of that anyways since it absorbs humidity from the air. while plastering the house I noticed that places with exposed cold 3M tape condense humidity readily but adjacent OSB has no visible condensation. Luckily , plastering doesn't take long......
later,
DJG
Dan, I should also note that Passive Design Solutions (they developed the wall system) have done extensive WUFI modelling on this wall system, the results of which show no issues for cladding with a vented rainscreen.
DeleteThanks for the reply David, much appreciated. I have a similar wall system under construction and was still debating whether to insulate the service wall. I think I will proceed but I may use mineral wool in bathrooms and the kitchen, if for nothing else but for peace of mind.
ReplyDeleteKeep up the good work!
Hi Dan, keep in mind that the performance of the building is only as good as the air sealing. Insulation alone only gets you part of the way. I tell people that R-value means nothing if you have an open window! Not literal of course but really to draw an analogy to air leaking in and having to be heated. Have you completed a blower door test? If not, I would recommend it. the cost is minimal for peace of mind. I'm on number 3. and probably have one more to do. I recommend Brad Dunn at Amerispec.
Delete